Chicken Loop and Dropper Rig by Captain Gregg
These few easy steps is the quickest most efficient way to tie the Chicken Loop or Dropper Rig. This is the Rig Captain Gregg uses when fishing the nearshore reefs for bottom fish. Furthermore it’s easy to tie a few ahead, then add / change out the type hook you want as well as change the Bank Sinker weight to effectively get your bait quickly to the bottom, without putting on more weight than needed.
The dropper rig chosen for charter boat fishing is designed not only to be effective for catching fish, but to permit the easy removal of terminal tackle in the case of ‘tangles’. Equally important, the more time spent out of the water untying tangles means less fishing opportunities and frayed tempers for my clients involved. Furthermore, it’s for this reason that three way swivels and wire are not permitted in this boat as they seem to attract tangles which are almost impossible to undo without cutting and this is unfair to the other People involved.
There are 3 knots used in every dropper rig:
A: Connection to main line
B: Dropper loops
C: Sinker connection loop
Every Knot on your line is important, Your line is only as strong as its weakest knot.
Below are the knots I suggest should be used in tying your rig. As they have a good knot strength and are relatively easy to tie
A: Connection to main line. The dropper rig should be connected to the main line by way of a swivel snap connected to the main line which clips into a brass ring attached to the dropper rig. Both these knots should have a good knot strength.
B: Dropper Loops. The loops themselves should be tied with a ‘Spider hitch. A little practice is required to get the loops the desired length.
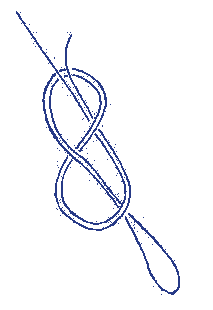
C: Sinker Loop. This loop should be tied using a ‘Figure of 8’ knots. This is the weakest knot in the rig and therefore ensures that the line will break at the sinker, if the lead is caught on the reef, but is strong enough to pull through weed and light coral.
Good knots usually are so because the strain on the line is carried well back into the body of the knot and evenly distributed so that there is no serious necking down where the line enters. A knot has to be carefully formed by seeing that the turns and pass-through are correct and then it has to be carefully watched to ensure that they do not slip out of place, become tangled or wrongly crossed over each other in pulling it down or closing it. As a knot is tightened, the line is compressed and in a poorly tied knot, this compression is concentrated on one point of the line, to the extent that the line can be almost completely severed at this point. Heat is also generated by friction as the knot tightens, this also weakens the line. A knot usually sets more evenly and results in better strength if the nylon is lubricated by placing it in the mouth for a few seconds before pulling it closed.
Examples of Knot strength
| Dropper Rig |
A: Trilene Knot |
B: Spider Hitch |
C: Figure 8 Knot |
|||
| Breaking Strain |
Good |
Poor |
Good |
Poor |
Good |
Poor |
|
90%+ |
40%- |
85%- |
40%- |
50%- |
40%- |
|
| 35lb | 31.50lb | 14.00lb | 29.75lb | 14.00lb | 17.50lb | 14.00lb |
| 30lb | 27.00lb | 12.00lb | 25.50lb | 12.00lb | 15.00lb | 12.00lb |
| 25lb | 22.50lb | 10.00lb | 21.25lb | 10.00lb | 12.50lb | 10.00lb |
| 20lb | 18.00lb | 8.00lb | 17.00lb | 8.00lb | 10.00lb | 8.00lb |
As will be seen from the above table, using a 35lb line as a dropper, and using the knots recommended above, (properly tied) the loops will break at just below the strength of the main line, whilst the sinker should remain attached when pulling through weed or light coral. It also shows just how much a poorly tied knot reduces the line strength. You may still land an average fish on a poor knot, but you will certainly lose the big one.
Above is an illustration of the 2 loop dropper rig, the length of the dropper loops and the distance between them is up to the individual, but in general the loops should be between 4 to 5 inches (10 to 12 cm) long with the bottom loop between 4 to 5 inches above the sinker loop. The second dropper loop must be far enough above the first loop to ensure that the two loops ( with hooks attached) do not overlap. eg; If both dropper loops are 4 inches long the second dropper loop should be tied a minimum of 12 inches above it . I have found that it is better to terminate the dropper loop with a small brass ring, rather than another loop as the Trilene knot is much stronger then the spider hitch, also loops are prone to break more easily when clipped over a snap swivel.
It is best to pre-tie your dropper loops before the fishing trip, so that you can spend more time over your knots. Having to tie them on the charter boat, when the fish are on the bite, not only uses up valuable fishing time, but could result in also tying poor knots in the rush, and then losing a good fish and/or another sinker.
The Knots.
 |
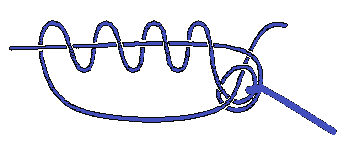
A: Trilene knot Trilene spent considerable research money and time developing the Trilene knot. Under an electron microscope this knot was seen to deliver stress more evenly than any other fishing knot known. The breaking strength for the Trilene knot is close to 100% for most lines and diameters. It is always above 90% if tied correctly. |
 |
Dropper Loop: Form a loop of the desired length, say 1.25m.
|
 Spider Hitch -Variation |
Dropper loop – variation Take the end of the line and double it to form a loop of the required size.
|
 |
Figure of 8 Knot
The figure of 8 Knot is relatively simple to tie- just make a loop of about 4 inches and follow the diagram. |
